HDMI whisperer: Unterschied zwischen den Versionen
Keine Bearbeitungszusammenfassung |
M68k (Diskussion | Beiträge) K clarification |
||
| Zeile 17: | Zeile 17: | ||
==How== | ==How== | ||
The [LINK] | The [LINK] cheap chinese HDMI switches we got have an IR remote control that comes with a 3.5mm audio connector to plug in a cape with a TSOP383. | ||
This receiver was plugged into the audio port of a Laptop and the generated audio was captured. | This receiver was plugged into the audio port of a Laptop and the generated audio was captured. | ||
| Zeile 23: | Zeile 23: | ||
That gave us 5 different Audio files. | That gave us 5 different Audio files. | ||
The files were post-edited using | The files were post-edited using audacity and now we can simply play them and attach the audio out from the raspberry pi directly to the HDMI switch IR receiver port with a small piece of voltage converter logic in between. | ||
==Data== | ==Data== | ||
Version vom 22. November 2015, 11:59 Uhr
| Language: | English |
|---|
| HDMI whisperer | |

| |
| Gestartet: | 21.11.2015 |
| Involvierte: | User:Phaer User:m68k User:Pk |
| Status: | active |
| Beschreibung: | It's a custom built remote control interface for our cheap chinese HDMI switches |
| Shutdownprozedur: | |
| Zuletzt aktualisiert: | 21.11.2015 |
What
Our HDMI switches provide only a classic infrared remote control, to control them via the Slackomatic we will replace the infrared receiver with a few wav files and a small custom built amplifier.
How
The [LINK] cheap chinese HDMI switches we got have an IR remote control that comes with a 3.5mm audio connector to plug in a cape with a TSOP383.
This receiver was plugged into the audio port of a Laptop and the generated audio was captured.
That gave us 5 different Audio files.
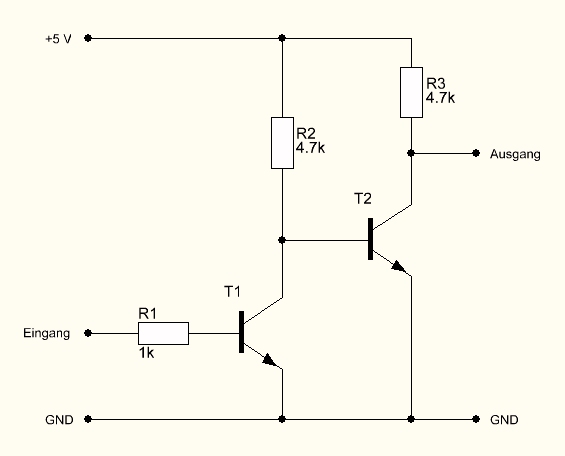
The files were post-edited using audacity and now we can simply play them and attach the audio out from the raspberry pi directly to the HDMI switch IR receiver port with a small piece of voltage converter logic in between.
Data
Wav files with the recoded ir commands:
Schematic
Circuit (n.b: the input is actually 3.3V instead of the shown 5V):
