Umbrella: Unterschied zwischen den Versionen
(added information about current version of the light switch) |
Anlumo (Diskussion | Beiträge) K (→How to use) |
||
| (16 dazwischenliegende Versionen von 5 Benutzern werden nicht angezeigt) | |||
| Zeile 1: | Zeile 1: | ||
| − | [[Datei: | + | __TOC__ |
| − | [[ | + | =Version 2.0= |
| − | [[Datei: | + | [[Datei:Umbrella_v2_bunt.jpg|300px|thumb|right|The new lamps lit up in all the colours]] |
| − | + | At several [[Jour_Fixe|Jour fixes]] ([[2022-02-22_Jour_Fixe#neues_Licht_im_Hauptraum_.28luto.2C_cube.2C_anlumo.29|2022-02-22_Jour_Fixe]], [[2022-04-26_Jour_Fixe#Upgrade_f.C3.BCr.27s_Upgrade_vom_Hauptraumlicht_.28ripper.2C_anlumo.2C_cube.2C_nicht_luto.29|2022-04-26_Jour_Fixe]] and [[2022-05-11_Jour_Fixe#Erhellung_Hauptraum_.28ripper.2C_fussel.29|2022-05-11_Jour_Fixe]]) the decision was made that the Umbrellas need an upgrade. The LED strips were replaced by four IKEA Tradfri LED bulbs which are mounted on a custom lasercut aluminium plate. | |
| − | + | [[Datei:Umbrella_v2_4er.png|300px|thumb|right|3D redering of the Aluminium plate with the LED bulbs]] | |
| + | |||
| + | == How to use == | ||
| + | [[User:anlumo|anlumo]] knows all the things about them! | ||
| + | |||
| + | They are all mapped into our [[SmartLab]] and controllable through Zigbee via Home Assistant. | ||
| + | |||
| + | Name convention: | ||
| + | |||
| + | * <code>light.Hauptraumschirm_<row>_<column>_<index></code> for individual lamps | ||
| + | * <code>light.Hauptraumschirm_<row>_<column></code> for individual umbrellas | ||
| + | * <code>light.Hauptraumschirm_<row></code> for rows of umbrellas | ||
| + | * <code>light.Hauptraumschirme</code> for all of them together | ||
| + | |||
| + | All numbers are 1-based. The indexes of the lamps inside umbrellas are random, but otherwise the numbering starts at 1,1 in the corner near the library and the kitchen. | ||
| + | |||
| + | == Hardware == | ||
| + | All CAD files can be found on Github: [https://github.com/Metalab/Umbrella_v2 Umbrella v2]<br> | ||
| + | [[User:ripper|ripper]] knows all the things about the hardware and will add this! | ||
| − | + | ToDo: add info on hardware thats not in the Github repo | |
| − | |||
| − | |||
| − | |||
| − | |||
| − | |||
| − | |||
| − | |||
| − | |||
| − | |||
| − | [ | + | == Maintenance == |
| + | The bulbs are standard, [https://www.ikea.com/at/de/p/tradfri-led-leuchtmittel-e27-806-lm-kabellos-dimmbar-farb-und-weissspektrum-rund-opalweiss-70439158/ Ikea TRÅDFRI RGB LED bulbs]. For replacing one, the umbrella needs to be removed by pushing them upwards and moving them towards the windows. | ||
| − | + | ToDo: how to replace components/fixtures | |
| − | |||
| − | + | == Credits == | |
| − | * | + | * [[User:anlumo|anlumo]]: setting up everything in metalabs home assistant, wiring up the fixtures |
| − | * the | + | * [[User:cube|cube]]: installing the fixtures, wiring 230V, 3D printing inserts |
| − | * | + | * [[User:luto|luto]]: teardown of the old lamps, assembling the lamps |
| − | * | + | * [[User:ripper|ripper]]: design, assembling and installing lamps, 3D printing inserts |
| + | * [[User:you|you?]]: Did you help? add yourself! | ||
| − | + | =Version 1.0= | |
| + | <span style="font-size: 16pt; color: red;">Outdated information, just here for documenting the history</span> | ||
| + | This version has been replaced.<br> | ||
| + | [[Datei:Buntschirm.jpg|right|miniatur]] | ||
| + | [[Datei:u_blue.jpg|right|miniatur]] | ||
| + | [[Datei:u_pink.jpg|right|miniatur]] | ||
| + | |||
| + | Umbrella is the ceiling lighting of the main room. It consist out of 12 umbrellas capable of emitting light in either 16581375 RGB shades or 65025 white shades. | ||
| − | + | The umbrellas are controllable with [https://en.wikipedia.org/wiki/Art-Net art-net]. | |
| − | |||
| − | |||
| − | |||
| − | |||
| − | |||
| − | |||
| − | |||
| − | |||
| − | |||
| − | |||
| − | |||
| − | |||
| − | + | ==How to simply turn on/off the light== | |
| − | + | Use the '''[[Interruttore/en|Interruttore]]''' light switch. | |
| − | + | == Access data == | |
| − | startUniverse: 3 | + | * WLAN SSID: metalights |
| + | * Protocol: [https://en.wikipedia.org/wiki/Art-Net art-net] | ||
| + | * Host: 10.20.255.255 | ||
| + | * startUniverse: 3 | ||
| + | * There are 60 channel, 5 channels (RGBWW) per umbrella. | ||
| − | |||
| − | ==Why== | + | == Why == |
| − | |||
| − | |||
| − | |||
| − | |||
| + | The Metalab needed some new lights. ART-net is awesome. | ||
| + | |||
== How == | == How == | ||
| − | Raspberry Pi 3 + Touchscreen | + | * Raspberry Pi 3 + Touchscreen |
| − | + | * Distro based on the QLC+ image (raspbian jessie) | |
| − | Distro based on the QLC+ image (raspbian jessie) | + | * QLC+ XServer less build that renders directly in GL buffers for performance |
| − | + | * H801 based clients (ESP8266) | |
| − | QLC+ XServer less build that renders directly in GL buffers for performance | + | * Arduino based firmware that implements ART-net |
| − | + | ||
| − | H801 based clients (ESP8266) | + | |
| − | |||
| − | Arduino based firmware that implements ART-net | ||
| − | |||
== Temporary setup with QLC+ == | == Temporary setup with QLC+ == | ||
| − | Connect to "metalights" WLAN | + | * Connect to "metalights" WLAN |
| − | + | * Set OUTPUT to 10.20.255.255 | |
| − | Set OUTPUT to 10.20.255.255 | + | * Set ARTnet universe to 3 |
| − | + | * There are 5 channels / Umbrella | |
| − | Set ARTnet universe to 3 | + | * R,G,B,WW,CW |
| − | + | * If CW or WW are anything else but "0" then R,G and B are disabled by firmware. | |
| − | There are 5 channels / Umbrella | + | * If R,G or B are anything but "0" then CW and WW are disabled by firmware. |
| − | + | * This is to save our power supplies from sudden heat death. | |
| − | R,G,B,WW,CW | + | * (105 watt / Umbrella max) |
| − | |||
| − | If CW or WW are anything else but "0" then R,G and B are disabled by firmware. | ||
| − | |||
| − | If R,G or B are anything but "0" then CW and WW are disabled by firmware. | ||
| − | |||
| − | This is to save our power supplies from sudden heat death. | ||
| − | |||
| − | (105 watt / Umbrella max) | ||
| − | |||
| + | |||
== Hardware == | == Hardware == | ||
H801 LED controller features: | H801 LED controller features: | ||
| − | |||
* 8 Mbit Storage (1 Mb) | * 8 Mbit Storage (1 Mb) | ||
* 5 channels each 45 watt max (~ 3.5 Ampere @ 12 V / channel) | * 5 channels each 45 watt max (~ 3.5 Ampere @ 12 V / channel) | ||
| Zeile 103: | Zeile 97: | ||
=== How to flash === | === How to flash === | ||
| + | |||
* Install [https://www.arduino.cc/en/Main/Software Arduino IDE] | * Install [https://www.arduino.cc/en/Main/Software Arduino IDE] | ||
* Install [http://esp8266.github.io/Arduino/versions/2.0.0/doc/installing.html ESP 8266 extensions] | * Install [http://esp8266.github.io/Arduino/versions/2.0.0/doc/installing.html ESP 8266 extensions] | ||
| Zeile 130: | Zeile 125: | ||
* [https://arduinojson.org/ ArduinoJson] (Version 5.13.3) | * [https://arduinojson.org/ ArduinoJson] (Version 5.13.3) | ||
| − | ==Who== | + | |
| + | == Who == | ||
Originally invented and built by [[Benutzer:overflo|overflo]], the umbrellas were built by a lot of people in some night shifts at Metalab | Originally invented and built by [[Benutzer:overflo|overflo]], the umbrellas were built by a lot of people in some night shifts at Metalab | ||
| − | LOTS | + | LOTS of support by |
| − | uniq, anlumo, ripper, bogdan <your name here> | + | * uniq, anlumo, ripper, bogdan <your name here> |
| − | + | ||
| + | |||
== QLC+ == | == QLC+ == | ||
| + | * Neue Fixture: [[Datei:Hauptraum_setup.qxw.txt]] (das muss nach ~/.qlcplus/fixtures/hauptraum-setup.qxf) | ||
| + | * Fixture: [[Datei:Metalab-Umbrella.txt]] (das muss nach ~/.qlcplus/fixtures/Metalab-Umbrella.qxf) | ||
| + | * Demo Desk: [[Datei:Test.txt]] | ||
| − | |||
| − | |||
| − | |||
| − | + | == Links == | |
| − | + | * [http://www.qlcplus.org/ QLC+] | |
| − | + | * [http://tinkerman.cat/closer-look-h801-led-wifi-controller H801] | |
| − | [http://www.qlcplus.org/ QLC+] | + | * [https://github.com/overflo23/H801_ARTnet Github] |
| − | + | * [http://www.artisticlicence.com/WebSiteMaster/User%20Guides/art-net.pdf ART-net Reference] | |
| − | [ | ||
| − | |||
| − | [https://github.com/overflo23/H801_ARTnet Github] | ||
| − | |||
| − | [http://www.artisticlicence.com/WebSiteMaster/User%20Guides/art-net.pdf ART-net Reference] | ||
[[Artnet]] | [[Artnet]] | ||
| − | + | * [https://github.com/reox/pybrella A Python implementation to control the umbrellas] | |
| − | [https://github.com/reox/pybrella A Python implementation to control the umbrellas] | ||
Aktuelle Version vom 22. August 2022, 17:09 Uhr
Version 2.0

At several Jour fixes (2022-02-22_Jour_Fixe, 2022-04-26_Jour_Fixe and 2022-05-11_Jour_Fixe) the decision was made that the Umbrellas need an upgrade. The LED strips were replaced by four IKEA Tradfri LED bulbs which are mounted on a custom lasercut aluminium plate.

How to use
anlumo knows all the things about them!
They are all mapped into our SmartLab and controllable through Zigbee via Home Assistant.
Name convention:
light.Hauptraumschirm_<row>_<column>_<index>for individual lampslight.Hauptraumschirm_<row>_<column>for individual umbrellaslight.Hauptraumschirm_<row>for rows of umbrellaslight.Hauptraumschirmefor all of them together
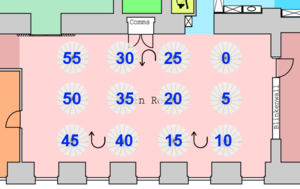
All numbers are 1-based. The indexes of the lamps inside umbrellas are random, but otherwise the numbering starts at 1,1 in the corner near the library and the kitchen.
Hardware
All CAD files can be found on Github: Umbrella v2
ripper knows all the things about the hardware and will add this!
ToDo: add info on hardware thats not in the Github repo
Maintenance
The bulbs are standard, Ikea TRÅDFRI RGB LED bulbs. For replacing one, the umbrella needs to be removed by pushing them upwards and moving them towards the windows.
ToDo: how to replace components/fixtures
Credits
- anlumo: setting up everything in metalabs home assistant, wiring up the fixtures
- cube: installing the fixtures, wiring 230V, 3D printing inserts
- luto: teardown of the old lamps, assembling the lamps
- ripper: design, assembling and installing lamps, 3D printing inserts
- you?: Did you help? add yourself!
Version 1.0
Outdated information, just here for documenting the history
This version has been replaced.


Umbrella is the ceiling lighting of the main room. It consist out of 12 umbrellas capable of emitting light in either 16581375 RGB shades or 65025 white shades.
The umbrellas are controllable with art-net.
How to simply turn on/off the light
Use the Interruttore light switch.
Access data
- WLAN SSID: metalights
- Protocol: art-net
- Host: 10.20.255.255
- startUniverse: 3
- There are 60 channel, 5 channels (RGBWW) per umbrella.
Why
The Metalab needed some new lights. ART-net is awesome.
How
- Raspberry Pi 3 + Touchscreen
- Distro based on the QLC+ image (raspbian jessie)
- QLC+ XServer less build that renders directly in GL buffers for performance
- H801 based clients (ESP8266)
- Arduino based firmware that implements ART-net
Temporary setup with QLC+
- Connect to "metalights" WLAN
- Set OUTPUT to 10.20.255.255
- Set ARTnet universe to 3
- There are 5 channels / Umbrella
- R,G,B,WW,CW
- If CW or WW are anything else but "0" then R,G and B are disabled by firmware.
- If R,G or B are anything but "0" then CW and WW are disabled by firmware.
- This is to save our power supplies from sudden heat death.
- (105 watt / Umbrella max)
Hardware
H801 LED controller features:
- 8 Mbit Storage (1 Mb)
- 5 channels each 45 watt max (~ 3.5 Ampere @ 12 V / channel)
How to flash
- Install Arduino IDE
- Install ESP 8266 extensions
- Choose generic ESP8266 Board under Tools->Board
- Settings for ESP8266:
- GENERIC ESP8266 Module
- Flash Mode: DIO
- Flash Size: 1M (512K SPIFFS)
- Debug Port: Disabled
- Debug Level: none
- Reset Mode: ck
- Flash Frequency: 40 MHz
- CPU Frequency: 80 MHz
- Upload Speed: 115200 or more

- U need a USB-to-UART-board (set to 3.3V)
- Connect GND to GND; RX to TX(!) and TX to RX(!); DO NOT CONNECT 3.3V!
- Set JUMPER on board to boot into flash mode. (Important! Has to be set before power is connected, so board gets into flashing mode.)
- Supply power via VCC & GND (12V should be adequate)
The code to flash can be found in the github repo. If you want to flash exactly this code (and what else would you flash in the main room), you will need these libraries:
- ArtnetWifi (Has to be installed via git clone to ~/Arduino/libraries)
- WifiManager
- ArduinoJson (Version 5.13.3)
Who
Originally invented and built by overflo, the umbrellas were built by a lot of people in some night shifts at Metalab
LOTS of support by
- uniq, anlumo, ripper, bogdan <your name here>
QLC+
- Neue Fixture: Datei:Hauptraum setup.qxw.txt (das muss nach ~/.qlcplus/fixtures/hauptraum-setup.qxf)
- Fixture: Datei:Metalab-Umbrella.txt (das muss nach ~/.qlcplus/fixtures/Metalab-Umbrella.qxf)
- Demo Desk: Datei:Test.txt