How to connect to the WPA2 EAP-TLS network: Unterschied zwischen den Versionen
Ra (Diskussion | Beiträge) (→Create certificates: +fingerprints) |
K (verschob „Archiv:How to connect to the WPA2 EAP-TLS network“ nach „How to connect to the WPA2 EAP-TLS network“ und hat dabei eine Weiterleitung überschrieben: fuck namespaces grml) |
||
| (10 dazwischenliegende Versionen von 6 Benutzern werden nicht angezeigt) | |||
| Zeile 1: | Zeile 1: | ||
| + | {{Veraltet}} | ||
| + | |||
== Create certificates == | == Create certificates == | ||
You need to create/use a certificate to connect to the WPA2 access point. | You need to create/use a certificate to connect to the WPA2 access point. | ||
| − | # Connect to the unencrypted wireless network '' | + | # Connect to the unencrypted wireless network ''metalab_802.11g_WPA2-certcreate'' |
| − | # Open your browser and go to https://10.215.23.1/ <br>Please verify the fingerprints to make sure that there is no man in the middle pretending to be webserver:<br>SHA1 E1:C4:0F:06:C9:0A:C0:71:D3:D5:75:73:C7:D8:ED:FD:E7:40:15:05 <br> MD5 24:28:1F:FF:4F:E5:EA:47:A0:3A:FD:D4:0D:A0:8B:62 | + | # Open your browser and go to https://10.215.23.1/ <br>Please verify the fingerprints to make sure that there is no man in the middle pretending to be webserver:<br>SHA1 E1:C4:0F:06:C9:0A:C0:71:D3:D5:75:73:C7:D8:ED:FD:E7:40:15:05 <br> MD5 24:28:1F:FF:4F:E5:EA:47:A0:3A:FD:D4:0D:A0:8B:62<br> For the even more paranoid people: you should also check the history of this page to verify that noone altered the checksums. |
# Create the certificate by entering a hostname and password | # Create the certificate by entering a hostname and password | ||
| Zeile 29: | Zeile 31: | ||
==== NetworkManager ==== | ==== NetworkManager ==== | ||
| − | Use ''yourname'' as identity, ''ca.crt'' as ca-certificate, ''yourname-cert.pem'' as client-certificate | + | ==== NetworkManager 0.6 ==== |
| + | Use ''yourname'' as identity, ''ca.crt'' as ca-certificate, ''yourname-cert.pem'' as client-certificate and ''secretpassword'' as key-password. | ||
| + | |||
| + | ==== NetworkManager 0.7 ==== | ||
| + | Use ''yourname'' as identity, leave the client-certificate untouched, ''ca.crt'' as ca-certificate, ''yourname-cert.p12'' as key (this includes the client cert) and ''secretpassword'' as key-password. | ||
=== MacOS X === | === MacOS X === | ||
| Zeile 42: | Zeile 48: | ||
[[Image:Wpa2_macgui.png|300px]]<br> | [[Image:Wpa2_macgui.png|300px]]<br> | ||
| − | Connect to the metalab-wpa2 network<br> | + | Connect to the metalab-wpa2 network <br> |
| + | (No Login, No Password, change the used certificate to the one you added to your Login keychain.)<br> | ||
| + | === Windows === | ||
| + | ==== Windows XP (SP3) ==== | ||
| + | * deine ...-cert.p12 doppelklicken, dem assistenten folgen (passwort wird gebraucht) | ||
| + | * ca.crt doppelklicke, dem assistenten folgen | ||
| + | eventuell, falls das nicht reicht um eine verbindung aufzubauen: | ||
| − | + | # Start -> Einstellungen -> Netzwerverbindungen -> doppelklick Drahtlose Netzwerkverbindung oder in der taskleiste auf das WLAN symbol | |
| − | + | # "Eigenschaften" | |
| − | + | # Reiter "Drahtlosnetzwerke" | |
| − | + | # Metalab ..._WPA2 auswählen | |
| + | # "Eigenschaften" | ||
| + | # Reiter "Authentifizierung" | ||
| + | # EAP-Typ: "geschütztes EAP (PEAP)" | ||
| + | # "Eigenschaften" | ||
| + | # Autthentifizierungsmethode auswählen: "Smartcard oder anders Zertifikat" | ||
== Manual server side setup == | == Manual server side setup == | ||
| Zeile 72: | Zeile 89: | ||
== Server documentation == | == Server documentation == | ||
tbd | tbd | ||
| + | |||
| + | |||
| + | [[Kategorie:Netzwerk]] | ||
Aktuelle Version vom 8. Mai 2013, 11:09 Uhr
| Der Inhalt dieses Artikels ist nicht mehr aktuell. Von der Metalab-Wiki-Startseite oder den Letzten Änderungen kommst Du zu den neuesten Beiträgen. |
Create certificates
You need to create/use a certificate to connect to the WPA2 access point.
- Connect to the unencrypted wireless network metalab_802.11g_WPA2-certcreate
- Open your browser and go to https://10.215.23.1/
Please verify the fingerprints to make sure that there is no man in the middle pretending to be webserver:
SHA1 E1:C4:0F:06:C9:0A:C0:71:D3:D5:75:73:C7:D8:ED:FD:E7:40:15:05
MD5 24:28:1F:FF:4F:E5:EA:47:A0:3A:FD:D4:0D:A0:8B:62
For the even more paranoid people: you should also check the history of this page to verify that noone altered the checksums. - Create the certificate by entering a hostname and password
You are now able to connect to the network by using the ca and your client certificate.
Use certificates
Linux
wpa_supplicant
sample wpa_supplicant.conf:
 network={
   ssid="metalab-wpa2"
   scan_ssid=1
   key_mgmt=WPA-EAP
   proto=WPA2
   eap=TLS
   pairwise=CCMP
   group=CCMP
   identity="yourname"
   ca_cert="/path/to/ca.crt"
   client_cert="/path/to/yourname-cert.pem"
   private_key="/path/to/yourname-key.pem"
   private_key_passwd="secretpassword"
 }
NetworkManager
NetworkManager 0.6
Use yourname as identity, ca.crt as ca-certificate, yourname-cert.pem as client-certificate and secretpassword as key-password.
NetworkManager 0.7
Use yourname as identity, leave the client-certificate untouched, ca.crt as ca-certificate, yourname-cert.p12 as key (this includes the client cert) and secretpassword as key-password.
MacOS X

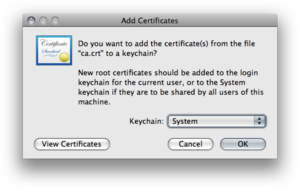
Import the ca-certifcate "ca.crt" to the system keychain.

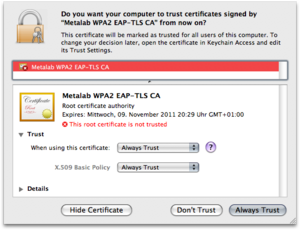
Set the trust level for the ca-certificate

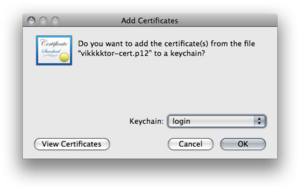
Import the client certifcate "yourname-cert.p12" to the login keychain with the choosen import password.

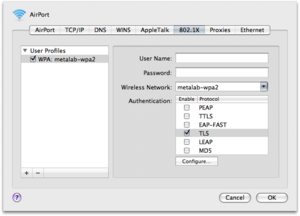
Connect to the metalab-wpa2 network
(No Login, No Password, change the used certificate to the one you added to your Login keychain.)
Windows
Windows XP (SP3)
- deine ...-cert.p12 doppelklicken, dem assistenten folgen (passwort wird gebraucht)
- ca.crt doppelklicke, dem assistenten folgen
eventuell, falls das nicht reicht um eine verbindung aufzubauen:
- Start -> Einstellungen -> Netzwerverbindungen -> doppelklick Drahtlose Netzwerkverbindung oder in der taskleiste auf das WLAN symbol
- "Eigenschaften"
- Reiter "Drahtlosnetzwerke"
- Metalab ..._WPA2 auswählen
- "Eigenschaften"
- Reiter "Authentifizierung"
- EAP-Typ: "geschütztes EAP (PEAP)"
- "Eigenschaften"
- Autthentifizierungsmethode auswählen: "Smartcard oder anders Zertifikat"
Manual server side setup
Create a certificate
 ## connect to wpa-01.in.metalab.at (10.20.30.25) as root.
 # user@host:~# ssh -l root wpa-01.in.metalab.at
 # root@wpa-01:~# ./mkclient.sh hostname password
 # root@wpa-01:~# exit
 ## copy the certificates to your host
 # user@host:~# scp -r root@wpa-01.in.metalab.at:/tmp/yourname.tar /path/to
Revoke certificate
 ## connect to wpa-01.in.metalab.at (10.20.30.25) as root.
 # user@host:~# ssh -l root wpa-01.in.metalab.at
 # root@wpa-01:~# cd /ca
 # root@wpa-01:~# ./revoke.sh yourname
 ## enter ca password
Server documentation
tbd