Blinkenpoi: Unterschied zwischen den Versionen
K |
|||
| (10 dazwischenliegende Versionen desselben Benutzers werden nicht angezeigt) | |||
| Zeile 1: | Zeile 1: | ||
| + | {| width="100%" | ||
| + | |||
{{Projekt | {{Projekt | ||
|image=Blinkenpoi.jpg | |image=Blinkenpoi.jpg | ||
| Zeile 7: | Zeile 9: | ||
|hidden=false | |hidden=false | ||
}} | }} | ||
| + | |||
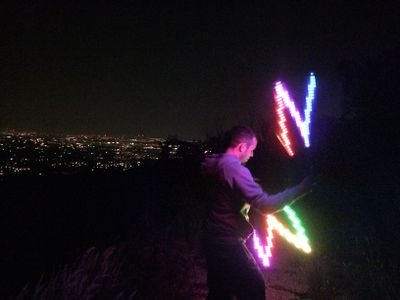
| + | [[Bild:Poi_flower.jpg|thumb|400px|right| Momentaufnahme]] | ||
| + | [[Bild:Poi_flower8.JPG|thumb|400px|right| Noch eine Momentaufnahme]] | ||
| + | [[Bild:Poi_stripes2.JPG|thumb|400px|right| Kurz darauf]] | ||
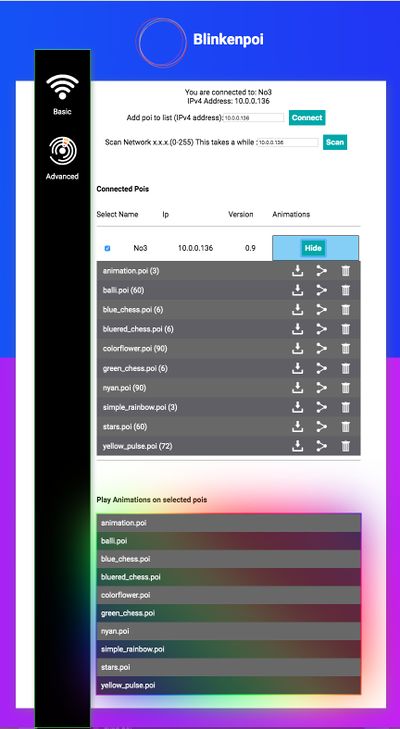
| + | [[Bild:Webinterface1.jpg|thumb|400px|right| Animationen aussuchen / abspielen / synchronisieren]] | ||
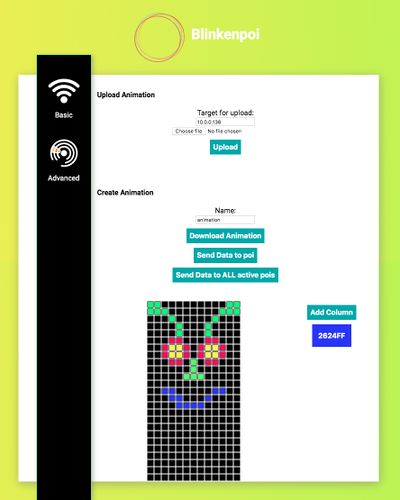
| + | [[Bild:Webinterface2.jpg|thumb|400px|right| Animationseditor / Upload]] | ||
== Blinkenpoi == | == Blinkenpoi == | ||
| − | * ESP8266 | + | * ESP8266 (WeMos D1 Mini) |
| − | * Custom PCB with 2 buttons | + | * Custom PCB with 2 buttons (1 working) |
| − | * Waterjet | + | * Waterjet cutted Polycarbonate body |
* 50 APA102 Leds | * 50 APA102 Leds | ||
* Battery holder for 3xAAA | * Battery holder for 3xAAA | ||
| Zeile 19: | Zeile 27: | ||
| + | == Trivia == | ||
| + | [[User:overflo|I]] started Blinkenpoi ~10 years ago and respawned that project 6 Weeks before CCCamp19 with a new Microcontroller, a Webinterface and modern Ledstrips. | ||
| + | |||
| + | The Webinterface has some cool features like "Local scan" to find other Blinkenpois automatically when they are connected to the same hotspot / mobile access point. | ||
| + | |||
| + | You can synchronize the playback on multiple devices, you can create, upload, download and share Animations directly in the Webinterface. | ||
| + | |||
| + | The Blinkenpoi opens its own Accesspoint for wireless setup and features: | ||
| + | * Local storage of wlan credentials | ||
| + | * Auto connect once configured | ||
| + | * Reset of configuration | ||
| + | * Verbose Debug Interface over usb->serial | ||
| + | * 3Mb storage for custom animations | ||
| + | * Firmware written in C++ (Arduino Framework) | ||
| + | * 100% Open Source Public Domain / Do whatever you want | ||
| + | |||
| + | == Usage == | ||
| + | |||
| + | Whenever you turn on a Blinkenpoi, the first led will shine in bright pink. | ||
| + | |||
| + | You have 2 seconds to press the button and override network setup while the led is pink. | ||
| + | |||
| + | If you override the setup the first available animation is loaded. | ||
| + | |||
| + | You can cycle trough all available animations with the button till the Blinkenpoi turns dark again. | ||
| + | |||
| + | If you press the button again the first animation is loaded again. | ||
| + | |||
| + | If you press the button for 2 seconds or longer the first led will flash red 3 times and the local config is erased. | ||
| + | |||
| + | All credentials and configurations are purged and it will open an Accesspoint on reboot for configuration. | ||
| + | |||
| + | When you turn on the Blinkenpoi for the first time, it opens an Accesspoint called "Blinkenpoi". | ||
| + | |||
| + | Once connected to it, you will be greeted by a captive portal / WLAN setup screen where you enter the credentials of the WLAN your Blinkenpoi should connect to and a name for the Blinkenpoi. | ||
| + | |||
| + | The led will turn from yellow to green and then dark if the Blinkenpoi connected successfully. | ||
| + | |||
| + | The Blinkenpoi is now connected and can be reached at [http://blinkenpoi.local http://blinkenpoi.local] from a machine connected to the same network. | ||
| + | |||
| + | There is a webinterface for configuration, network scanning, animation playback and animation creation available directly on the Blinkenpoi. | ||
| + | |||
| + | |||
| + | == Assembly Instructions == | ||
| + | |||
| + | Video: [https://youtu.be/GTyP3mMjG5w Handstrap] | ||
| + | |||
| + | Video: [https://youtu.be/9AM9bLseyD4 Blinkenpoi assembly] | ||
| + | |||
| + | |||
| + | |||
| + | == Animation format== | ||
| + | |||
| + | The Animations are saved on the Blinkenpoi in a raw format. | ||
| + | |||
| + | Each Pixel has 3 Bytes for RGB, There are 50 Pixels, but only 25 on each Side. | ||
| + | |||
| + | We save 25*3 Bytes / Column and simply read the bytes back from the file and set the RGB values from that data. | ||
| + | |||
| + | No headers. no metadata, but super fast. | ||
| + | |||
| + | When we reach the end of the file we just set the filedescriptor to seek(0) and start over. | ||
| + | |||
| + | == User contributed Usage guid == | ||
| + | |||
| + | pink: colour after starting the poi - press button now to ovverride the network setup - longpress leads to NETWORK RESET and 3x red blinking | ||
| + | |||
| + | white: connecting with previously configured network | ||
| + | |||
| + | green: connected with configured network | ||
| + | |||
| + | yellow: Open Access Point on Blinkenpoi for setup | ||
| + | |||
| + | |||
| + | |||
| + | Reset Wifi-Setup: | ||
| + | |||
| + | After starting, when LED is pink, press and hold the reset-button. Then the LED should flash red three times. | ||
| + | |||
| + | |||
| + | |||
| + | Connect Poi to your Wifi: | ||
| + | |||
| + | Connect the Poi via USB to your Computer. | ||
| + | Search for Blinkenpoi in the accessable networks. | ||
| + | Connect to it. | ||
| + | A captive portal is opened (browser popup). | ||
| + | If it does not open automatically open a browser and go to [http://192.168.4.1] | ||
| + | Choose Wifi-Setup in the menu and choose your wifi (for example the Hotspot of your Smartphone), enter the password and click "Save". | ||
| + | The poi should turn from yellow to green after a couple of seconds and turn dark on successful pairing to the hotspot. | ||
| + | |||
| + | Now, when you start the poi, the LED first flashes pink, then white and finally green and turns off again. | ||
| + | In your Wifi-Device/Smartphone open the Browser and enter blinkenpoi.local. | ||
| + | If your device does not support MDMS - which is the case for android - you have to enter the IP-Adress of your Poi. | ||
| + | If you don't know its IP address you can use nmap, look on the router or attach a usb cable and take a look on the terminal provided by the blinkenpoi. | ||
| + | for example '''screen /dev/tty.usbserial0 115200''' | ||
| + | or you could connect another computer that can resolve nDNS to your hostpot and open http://blinkenpoi.local in the browser | ||
| + | |||
| + | |||
| + | |||
| + | == Series of Tubes == | ||
| + | [https://github.com/overflo23/blinkenpoi GITHUB repo] | ||
| + | |||
| + | |||
| + | |} | ||
| − | + | __NOTOC__ | |
Aktuelle Version vom 30. Dezember 2019, 22:06 Uhr
| Blinkenpoi | |

| |
| Gestartet: | 16.7.2019 |
| Involvierte: | overflo |
| Status: | in progress |
| Beschreibung: | poi with leds |
| Shutdownprozedur: | |
| Zuletzt aktualisiert: | 2019-12-30 |
Blinkenpoi
- ESP8266 (WeMos D1 Mini)
- Custom PCB with 2 buttons (1 working)
- Waterjet cutted Polycarbonate body
- 50 APA102 Leds
- Battery holder for 3xAAA
- Transparent rubber tube
- Fingerloops / Attachments
Trivia
I started Blinkenpoi ~10 years ago and respawned that project 6 Weeks before CCCamp19 with a new Microcontroller, a Webinterface and modern Ledstrips.
The Webinterface has some cool features like "Local scan" to find other Blinkenpois automatically when they are connected to the same hotspot / mobile access point.
You can synchronize the playback on multiple devices, you can create, upload, download and share Animations directly in the Webinterface.
The Blinkenpoi opens its own Accesspoint for wireless setup and features:
- Local storage of wlan credentials
- Auto connect once configured
- Reset of configuration
- Verbose Debug Interface over usb->serial
- 3Mb storage for custom animations
- Firmware written in C++ (Arduino Framework)
- 100% Open Source Public Domain / Do whatever you want
Usage
Whenever you turn on a Blinkenpoi, the first led will shine in bright pink.
You have 2 seconds to press the button and override network setup while the led is pink.
If you override the setup the first available animation is loaded.
You can cycle trough all available animations with the button till the Blinkenpoi turns dark again.
If you press the button again the first animation is loaded again.
If you press the button for 2 seconds or longer the first led will flash red 3 times and the local config is erased.
All credentials and configurations are purged and it will open an Accesspoint on reboot for configuration.
When you turn on the Blinkenpoi for the first time, it opens an Accesspoint called "Blinkenpoi".
Once connected to it, you will be greeted by a captive portal / WLAN setup screen where you enter the credentials of the WLAN your Blinkenpoi should connect to and a name for the Blinkenpoi.
The led will turn from yellow to green and then dark if the Blinkenpoi connected successfully.
The Blinkenpoi is now connected and can be reached at http://blinkenpoi.local from a machine connected to the same network.
There is a webinterface for configuration, network scanning, animation playback and animation creation available directly on the Blinkenpoi.
Assembly Instructions
Video: Handstrap
Video: Blinkenpoi assembly
Animation format
The Animations are saved on the Blinkenpoi in a raw format.
Each Pixel has 3 Bytes for RGB, There are 50 Pixels, but only 25 on each Side.
We save 25*3 Bytes / Column and simply read the bytes back from the file and set the RGB values from that data.
No headers. no metadata, but super fast.
When we reach the end of the file we just set the filedescriptor to seek(0) and start over.
User contributed Usage guid
pink: colour after starting the poi - press button now to ovverride the network setup - longpress leads to NETWORK RESET and 3x red blinking
white: connecting with previously configured network
green: connected with configured network
yellow: Open Access Point on Blinkenpoi for setup
Reset Wifi-Setup:
After starting, when LED is pink, press and hold the reset-button. Then the LED should flash red three times.
Connect Poi to your Wifi:
Connect the Poi via USB to your Computer. Search for Blinkenpoi in the accessable networks. Connect to it. A captive portal is opened (browser popup). If it does not open automatically open a browser and go to [1] Choose Wifi-Setup in the menu and choose your wifi (for example the Hotspot of your Smartphone), enter the password and click "Save". The poi should turn from yellow to green after a couple of seconds and turn dark on successful pairing to the hotspot.
Now, when you start the poi, the LED first flashes pink, then white and finally green and turns off again. In your Wifi-Device/Smartphone open the Browser and enter blinkenpoi.local. If your device does not support MDMS - which is the case for android - you have to enter the IP-Adress of your Poi. If you don't know its IP address you can use nmap, look on the router or attach a usb cable and take a look on the terminal provided by the blinkenpoi. for example screen /dev/tty.usbserial0 115200 or you could connect another computer that can resolve nDNS to your hostpot and open http://blinkenpoi.local in the browser
Series of Tubes


