Metaboard/2010 activities/Hacksession 2010-09-17: Unterschied zwischen den Versionen
Chrysn (Diskussion | Beiträge) added picture |
Chrysn (Diskussion | Beiträge) K i'm sure it's him now |
||
| Zeile 1: | Zeile 1: | ||
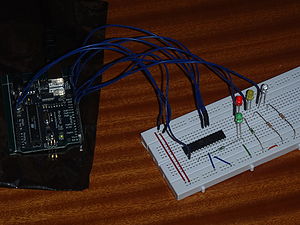
[[image:Arduino flashes atmega.jpg|thumb|The ATmega168 is programmed by the Arduino, using three wires for MISO/MOSI/SCK, one for reset, and three LEDs for status indication. The green LED is used to show that the ATmega can run its own programs.]] | [[image:Arduino flashes atmega.jpg|thumb|The ATmega168 is programmed by the Arduino, using three wires for MISO/MOSI/SCK, one for reset, and three LEDs for status indication. The green LED is used to show that the ATmega can run its own programs.]] | ||
* Received a short introduction to [[PCB CNC]] from [[user:bkubicek]] | * Received a short introduction to [[PCB CNC]] from [[user:bkubicek]]. | ||
* Had a look at the [[Bauteilsortiment]] -- they have almost everything we need. notable exceptions are an rs485 serial driver and an RFM12 (there are three RFM12B, though; considering switching to 3.3V). | * Had a look at the [[Bauteilsortiment]] -- they have almost everything we need. notable exceptions are an rs485 serial driver and an RFM12 (there are three RFM12B, though; considering switching to 3.3V). | ||
* Built a minimal programmer using an arduino and the layout from [http://arduino.cc/en/Tutorial/ArduinoISP the ArduinoISP tutorial]. [http://jimsmindtank.com/using-the-arduinoisp-sketch-part-2/ Another tutorial] was helpful too. | * Built a minimal programmer using an arduino and the layout from [http://arduino.cc/en/Tutorial/ArduinoISP the ArduinoISP tutorial]. [http://jimsmindtank.com/using-the-arduinoisp-sketch-part-2/ Another tutorial] was helpful too. | ||
Aktuelle Version vom 29. September 2010, 16:19 Uhr

- Received a short introduction to PCB CNC from user:bkubicek.
- Had a look at the Bauteilsortiment -- they have almost everything we need. notable exceptions are an rs485 serial driver and an RFM12 (there are three RFM12B, though; considering switching to 3.3V).
- Built a minimal programmer using an arduino and the layout from the ArduinoISP tutorial. Another tutorial was helpful too.
- Using this configuration, sketches can be uploaded to the second ATmega168 with the usual Makefiles (it helps to set the F_CPU correctly, though, otherwise the delay function produces slightly off results)
Next steps are uploading the V-USB bootloader to the ATmega and experimenting with USB HID; ordering missing components.