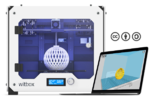
Witbox: Unterschied zwischen den Versionen
Keine Bearbeitungszusammenfassung |
Keine Bearbeitungszusammenfassung |
||
| Zeile 110: | Zeile 110: | ||
** [https://blog.adafruit.com/2014/12/04/bq-witbox-review-by-tom-3dthursday-3dprinting/ Adafruit article] | ** [https://blog.adafruit.com/2014/12/04/bq-witbox-review-by-tom-3dthursday-3dprinting/ Adafruit article] | ||
** [https://chopmeister.blogspot.cz/2014/08/sifting-through-features-or-guide-to.html 'Sifting through the features or "The Guide to Not Buying a 3D Printer"']. | ** [https://chopmeister.blogspot.cz/2014/08/sifting-through-features-or-guide-to.html 'Sifting through the features or "The Guide to Not Buying a 3D Printer"']. | ||
Version vom 31. Oktober 2015, 09:45 Uhr
3D-Scanner - CNC-Fräse - Laser - Reflow Oven - 3DPrinter (Prusa Mk3S, Prusa Mini) - Vinylplotter - Schweißinverter -Tischbohrmaschine - Drehbank - Ultraschallreiniger - Nähmaschinen
| Sprache: | Deutsch |
|---|
| Witbox | |

| |
| Eigentümer: | Metalab |
| Status: | Aktiv |
| Erfordert Einschulung: | Ja |
| Erfordert Authentisierung: | Ja |
| Kostet: | 0.10 euro / gram |
| Hilfsbereite: | |
It is OK to use the printer as it is.
It is NOT OK to modify it in any way.
This is a consumer grade semi professional machine, if you want to tinker with a 3d-printer check out the mendel90 reprap.
Overview
Filament diameter 1.75mm
Layer height: 0.05-0.25 mm (0.2 is fast and looks good)
Material: PLA only
Firmware version: 1.4.2 ( 29.10.2015)
This machine was sponsored (better price) from 3dee.at
How to use it
Calibration (before every job @ metalab)
- There is a calibration sheet inside the witbox.
- Calibration is simple. Just follow the instructions on the menu.
- Configuration -> Level plate
Load / Change Filament if neccessary - Careful not to entangle the filament!!
- To change or unload the filament select the matching option from the menu
- very gently apply some pull to the filament and you will feel that the filament is actually pulled for extraction first and after some seconds it is ejected
- Once the filament is eject apply some more pullign force
- when the filament comes loose pull sharply and remove the filament from the tube completely (also any long debris that might hang off the filament needs to get out)
Save your .gcode to the SD card
- Start cura
- Import .stl
- Save to SD
- Done.
Start job from menu
- Select "Print from SD"
- Select your job
- Push dialing wheel- > job starts
Wisdom Tables
These settings have been tested and worked fine. ✔
| MATERIAL | Layer height | Speed | Temperature (°C) | Who tried this | Notes |
|---|---|---|---|---|---|
| PLA Neon Green | 0.1mm | 80mm/sec | 210C | overflo | Good. |
| PLA WHITE (no name big spool) | 0.1mm | 80mm/sec | 210C | overflo | Looks better at higher temperature |
| PLA Black bq | 0.1mm | 80mm/sec | 210C | overflo | Good. |
| PLA transparent bq | 0.1mm | 80mm/sec | 210C | overflo | Good. |
| PLA purple noname (3dee.at) | 0.1mm | 80mm/sec | 210C | overflo | Good. |
These settings caused some problems ✘
| MATERIAL | Layer height | Speed | Temperature (°C) | Who tried this | Notes |
|---|---|---|---|---|---|
| WHAT? | LAYER? | SPEED | TEMPERATURE | you | COMMENTS |
Software
Supporters
Diverse Links
- Design of the 3D-Printer is under CreativeCommons licence.
- heise.de comparsion of different printers (German) (pro for our use: we can buy replacement parts easily in Vienna)
- Review of the printer (German)
- Other reviews (english):
