Metaboard: Unterschied zwischen den Versionen
Cs (Diskussion | Beiträge) (Added section about boot loader) |
|||
| Zeile 3: | Zeile 3: | ||
Metaboard is a USB based prototyping board for Atmel's AVR microcontrollers. It is designed to be (mostly) compatible with [http://www.arduino.cc/ Arduino]. It's entire design (hardware and firmware) is Open Source. | Metaboard is a USB based prototyping board for Atmel's AVR microcontrollers. It is designed to be (mostly) compatible with [http://www.arduino.cc/ Arduino]. It's entire design (hardware and firmware) is Open Source. | ||
= Design | = Design Goals = | ||
* Low complexity and thus extremely low price. | * Low complexity and thus extremely low price. | ||
Version vom 22. Januar 2008, 08:22 Uhr
What is Metaboard?
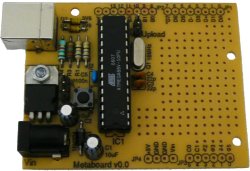
Metaboard is a USB based prototyping board for Atmel's AVR microcontrollers. It is designed to be (mostly) compatible with Arduino. It's entire design (hardware and firmware) is Open Source.
Design Goals
- Low complexity and thus extremely low price.
- Single sided PCB so that the board can be manufactured at home. If professionally manufactured, a single sided board is still cheaper.
- No SMD components. Easy to assembler at home.
- (Mostly) compatible with Arduino in board dimension and connector layout. Can also be programmed by Arduino's development environment via USB.
- No upfront investment for development environment or programmer hardware.
- Breadboard area on board.
- Completely Open Source.
Hardware
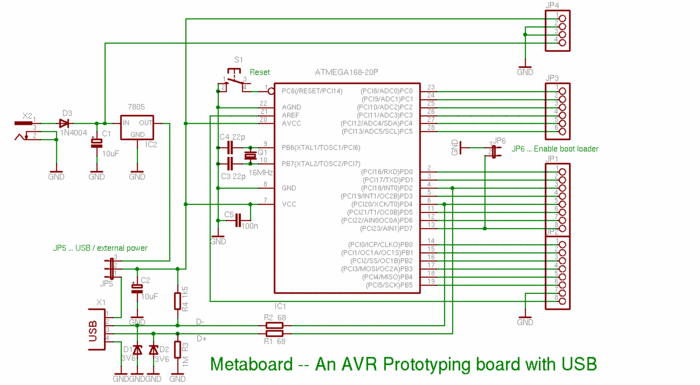
Since USB is implemented in firmware, no special USB driver chip is needed. Circuit diagram:

The most recent version of Metaboard can always be obtained via SVN from https://whatever.metalab.at/user/cs/metaboard/trunk.
Firmware
Metaboard is best used with USBaspLoader. This is a boot loader which emulates USBasp, a USB based AVR programmer. The main firmware loaded with this boot loader is your business, of course.
Development Resources
Metaboard can either be used with the free GCC tool chain or with Arduino's free Integrated Development Environment. Arduino offers a set of example projects, documentation and a user community which is especially helpful for the beginner. Since Metaboard is not entirely equivalent to the Arduino board, not all example projects can be used out of the box. We plan to offer example projects made especially for Metaboard.
The GCC toolchain can be dowloaded from:
- Windows: http://winavr.sourceforge.net/
- Mac OS X: http://www.obdev.at/avrmacpack/
- Linux and other Unixes: See http://www.nongnu.org/avr-libc/user-manual/install_tools.html
Example projects based on GCC can be found at http://www.obdev.at/avrusb/. Since these examples have not been developed for Metaboard, they must be modified with Metaboard's pin assignments and clock rate.
All resources related to Arduino can be found at http://www.arduino.cc/.
Metaboard for Arduino Users
Metaboard has been designed to be mostly compatible with Arduino, but there are relevant differences:
- Connector position: All connectors are on 2.54 mm grid positions so that extension circuits can be easily built on breadboard.
- Upload procedure: A jumper is used to select bootloader mode and the reset key must be pressed to activate the boot loader.
- Upload protocol: Metaboard emulates USBasp, not STK500.
- AVR's UART lines are not used for USB. This means that they can be used for other purposes, but also that debug output written to the UART cannot be directly received via USB.
In order to upload firmware from Arduino's IDE, the file hardware/boards.txt in Arduino's main folder must be changed. Add the following lines at the end of the file:
##############################################################

metaboard.name=Metaboard

metaboard.upload.protocol=usbasp
metaboard.upload.maximum_size=14336
metaboard.upload.speed=19200

metaboard.build.mcu=atmega168
metaboard.build.f_cpu=16000000L
metaboard.build.core=arduino

##############################################################
Since Arduino insists on having a serial line to upload the firmware (although none is needed for usbasp), you may have to edit Arduino's preferences.txt file manually and set the variable serial.port to an existing device. Preferences.txt is in ~/Library/Arduino on the Mac.
