PacmanCaster
(Weitergeleitet von Pacitar)
| PacmanCaster | |

| |
| Gestartet: | 23.5.2018 |
| Involvierte: | User:amir |
| Status: | in progress |
| Beschreibung: | Building a DIY e-guitar in PacMan style |
| Shutdownprozedur: | |
| Zuletzt aktualisiert: | 2020-05-24 |
WTF
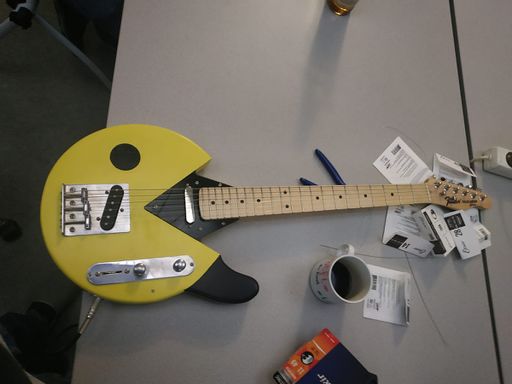
This project page is about building a DIY electric guitar in PacMan style. Pickup-, control- and neck design are copied from a Telecaster guitar.
We are going to use the CNC mill to create the body.
This page is about the e-guitar i built. :)
30 Essential items for building and assembling a guitar body
The following list of items is what _I_ found to be essential for building a guitar body in a timely fashion. You might be able to do it with a completely different stack or simply less items.
- Wood
- A CNC router
- A long mill bit with 6 or less mm diameter (rounding radius of <= 3) that works all the way through 45 mm thick wood
- A sanding block
- Sanding paper 40-5000 grit
- A router table (can be easily constructed from a template router)
- An orbital sander (well, not strictly necessary but it safes lots and lots of time)
- An oscillating belt and spindle sander. (also a huge time safer)
- A band saw (you can easily find your way around this one, but it's a huge comfort)
- Wood drill set
- Metal drill set
- Screw driver set
- A set of hex keys
- A wire cutter
- A solder iron
- Solder tin
- Guitar electronics
- Gavitt Wire
- A multimeter
- Shielding tape
- An air brush
- A wood primer that also acts as a filler
- Compatible paint
- Compatible lacquer
- Car polish
- Rubber (nitril) gloves
- Masking tape
- Forstner bits
- Milling bits with a thrust ring for the router table
- Respirator mask
Images Speak Louder Than Words
But videos are clearly louder
That is a video of the pacmancaster before adjusting neck, bridge and pickups. Let's see if i can get it right on my own. Stay tuned.
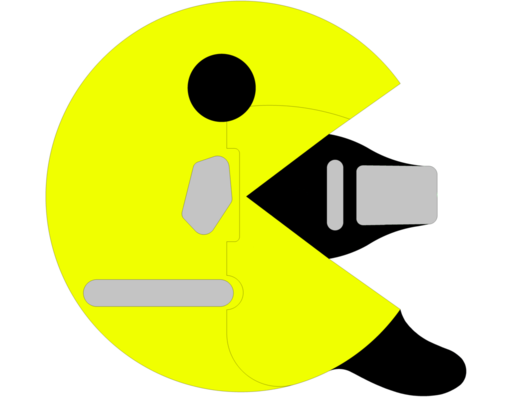
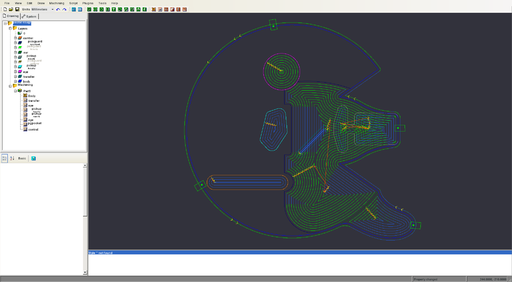
The following previews are out of date but i guess you get the idea. Check out the image and video above
Design Preview
CAM Preview
Lessions learned
The following "lessions learned" reflect my current level of knowledge which might be not very high :)
- It seems like if the neck is good, the bridge in alignment and the body follows some simple rules - you get a good guitar.
- the body design has to adhere to following rules for a good sound:
- If you do a solid body design avoid large cavities, especially under the pick guard.
- Avoid destabilizing the body in the neck axis.
- You can tune the guitars resonance frequency by removing material (but how much depends on where you remove material. Removing material inline with the neck has the greatest effect)
- The neck pocket needs to be perfectly in alignment and fit. Sound waves need to pass freely between neck and body.
- Unless you are very skilled you should at least CNC the neck pocket.
- If you mill a very deep profile you run into risk of getting the milling head stuck. Instead make a circular pocket (following the profile) about 1.5x the mill size (and adjust your step over accordingly). That way you'll create a profile that will be milled by two circular operations (they should partially overlap) per step down. Also vacuum thoroughly all the time and try to find settings that avoid long chips.
- Certified mahogany is a real nice material for milling but hard to get the paint job right. Pretty homogeneous (nice for milling) on the one hand and on the other with large pores (not nice for the paint job). Ripper told me about a filler material you can use to smooth it out and apparently Gibson does it that way because they mention it in a YouTube video pk sent me.
- The following videos pk sent me are very interesting, not only because the reveal methodology but also because it pictures the industry.
- https://www.youtube.com/watch?v=nu6wCqqPkew
- https://www.youtube.com/watch?v=uVU86GGV07A
- https://www.youtube.com/watch?v=VbU1R4KDymw
- The 2 first passes of sanding the wood right before painting are the most important ones. Yeah i know it's pretty common knowledge but I want to remind myself and maybe others to do it properly.
- Do the first pass in direction of the grain. Do the second pass orthogonal to the grain, and water the wood first.
- There are dedicated sanding liquids. I want to get some and compare it to using just water.
- There is a ton of dedicated tools for even the smallest things. Get some.
- Metalab doesn't have the space and tools for a real high quality finish.
- Pockets are hard to sand and paint. Rather us engravings for visual effects.
- Steep concavities on the profile of the body are a real challenge to sand and paint.
- Building a high quality neck is some next level stuff but building a high quality body is not that hard
- Banding e-guitars is only done for aesthetic reasons.
- Use fine sand paper to "cut" masking tape at edges of the workpiece
- If you want a perfectly sharp border between two colors of the paint job proceed as follows (using yellow and black as examples):
- After every time you paint the work piece patiently wait for it to be completely dry.
- Paint the area that should be yellow with yellow paint. The yellow paint job has to be completely finished except for the final sanding and polishing. Don't worry about the sharp border yet and over-paint a bit (maybe around a centimeter).
- Now generously mask the yellow area with paper masking tape and cover areas far from the border with paper. make sure the masking tapes outlines the sharp border perfectly and except for the area designated to black everything is covered. Properly covering the work piece prevents damage to the work piece by overspray or such.
- Now again mask the outline perfectly with tape, but this time with electrical tape on top of the paper masking tape.
- Now perform a yellow paint job (except for the final sanding and polishing) on the area designated for black and overpaint the masking tape. the reason for this step is, that neither your paint job nor the masking will ever be so perfect as to not leaving minuscule cavities below the masking tape for the paint to bleed into. And by painting with yellow first we make sure those cavities below the tape are filled with yellow and no black can bleed into the yellow paint job anymore.
- Now perform the black paint jobs on top.
- Remove all masking tap and coverings and perform the final sanding and polishing.
- High-end guitars use shielding tape in all the electronics hodling pockets.
- Don't believe any guitar myths you haven't checked. Especially when it comes to acoustics and electro-acoustics. The music-tech world is full of esoterics.
- There is a myth that says that the bigger/heavier the solid body is, the more sustain you get. I tested this one by cutting (a failed but functional) version of the guitar step by step down to the bare mininum. At the end the difference in sustain was still marginal while the weight difference was huge. No reason for uncomfortably heavy guitars. also, other qualities of the sound (spectrum, loudness, etc..) only change slightly. So having some meat on the guitar is a good thing while it doesn't justify building back-breakers.
Ideas
- Build a unibody guitar. neck and body out of one piece
- Enhance the guitar with electronics. e.g.:
- Decorate with addressable LEDs
- Add an equalizer and maybe other analog effects. Or maybe build and use external effects processors to tune the guitar to a specific sound and than integrate those effects with fixed settings hidden in the guitar
- Use LEDs on the fretboard for learning (see: http://www.fretzealot.com. But do it better
- Built-in recording to sdcard?
- Build an aluminum (or maybe steel?) guitar with a slight spring effect in neck axis. make that "spring" adjustable in hardness as well as resonance frequency.
- Tune the pickups by attaching an electromagnet to each of the poles and manipulate magnetic strength individually
Checklist
- Mill the guitar on the cnc.
- Cut the remainders away.
- Drill all holes
- Sand the workpiece completely. 40, 80, 120, 180, 240.
- Work edges with the template router
- Carefully sand the edges
- Wet the wood and wait for it to dry
- Hang the guitar by a thread
- Prime the workpiece 3 times
- Wet-sand with 400
- Paint the workpiece 3 times
- Wet-sand with 400
- Apply lacquer 2 times
- Wet-sand with 600
- Apply lacquer 2 times
- Wet-sand with 600
- Apply lacquer 3 times
- Wet-sand with 600, 1200, 2000
- Polish the workpiece
Shopping List
ASAP
007.99€ 1x Rubber gloves- 011.99€ 1x Car polish
010.99€ 1x Wax paper008.78€ 1x Gavitt Wire020.00€ 1x Aluminum plate for the construction of a table router008.99€ 1x Shielding tape029.98€ 2x Guitar screw kit221.79€ 1x Oscillating belt and spindle sander081.12€ 1x Long milling bit140.00€ 2x Corpus wood- 116.78€ 1x Band saw
090.92€ 1x Airbrush set small040.99€ 1x Airbrush set big- 030.00€ 2x Guitar Strings
020.97€ 3x Protective suite062.28€ 1x Filter pads- 600.00€ 2x Used Telecaster
Some Day
- https://www.stewmac.com/Luthier_Tools/Tools_by_Job/Tools_for_Electronics_and_Pickups/Pickup_building/Mojotone_Pickup_Winding_Machine.html
- https://www.stewmac.com/Luthier_Tools/Tools_by_Job/Tools_for_Fretting/Essential_Fretting_Tool_Set.html
- https://www.stewmac.com/Luthier_Tools/Tools_by_Job/Tools_for_Fretting/Fret_Arbor_Press_System.html


